
 Show Navigation
 Hide Navigation
Our Blog - and Breakfasts
- More Posts:
- Chocolate Croissants
- Turn-Down Treats
- Eating Local
- Sweet AND Savoury
- Muffins
- Crab and Mushroom Frittata
- Something Old, Something New
- Smoked Salmon Hash
- Croissants!
- Good Morning!
Sticky Bun Smackdown!

We’ve served sticky buns to guests on occasion, but we never felt that they were as good as some of our other fresh baking. Our muffins are always a huge hit, especially in the spring with fresh rhubarb from the Farmers’ Market; Chocolate-Chip Banana Bread disappears; homemade croissants leave nothing but flakey crumbs in the basket once guests finish with them. But our couple of attempts at sticky buns, back in 2013, were just so-so. No complaints, but no raves either, and so we dropped them from the menu rotation.
We continued to believe that sticky buns are a cravable item, and so we decided to take advantage of some dreary winter days to do some “Research and Development” for the 2016 season. We knew we wanted to start with a brioche-based dough. Brioche is a classic French bread, enriched with butter and eggs. Its richness and texture – fluffy and light – is the perfect starting point for sticky buns.
[Tangent: Brioche is actually the French word, usually translated as “cake,” in the famous quotation, “Let them eat cake” - Qu'ils mangent de la brioche. See the Wikipedia link for some more interesting trivia about this provocative statement, including its incorrect, but common, attribution to Marie Antoinette.]
After combing through a lot of different options with which to experiment, we settled on two high potential options. The first is from Joanne Chan’s cookbook, Flour, from the bakery of the same name in Boston. It is a lovely book, and the author has an interesting background, transitioning from a degree in Applied Mathematics and Economics at Harvard, to owning and operating a bakery. Sounds vaguely familiar! She also beat Bobby Flay with her sticky bun recipe on an episode of Food Network’s Throwdown.
The second candidate was our sentimental option, from Baking with Julia. From the late 1990s PBS series, and the companion cookbook, it was fun and nostalgic to review this approach. On this episode, Julia Child’s guest was Nancy Silverton, whose own books, Breads of La Brea Bakery, Pastries from the La Brea Bakery, and much more recently, Mozza, are all excellent in their own right.
Interestingly, both recipes use almost exactly the same ingredients, with a couple of variations. This, along with significantly different techniques, lead to a startling different outcome.
The Flour Approach
Flour, eggs, yeast, sugar, milk and a bit of salt are mixed until a shaggy dough forms.


Then, softened butter (don’t ask how much!) is gradually kneaded in, a tablespoon at a time.

A very long mixing follows – 15 minutes. At the end of this marathon, the dough has morphed from something inconsistent and almost blotchy, to something silky smooth, soft, and a little warm to the touch.

Off it goes to the refrigerator for the yeast to slowly work its magic.

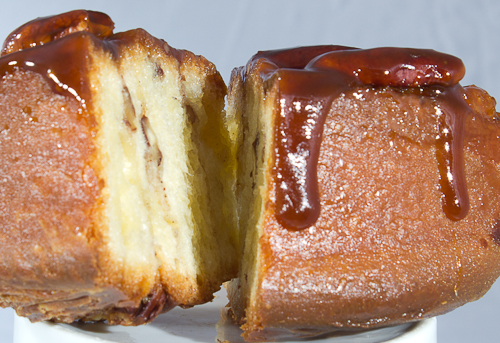
Sticky buns are usually “upside-down” cakes in that the gooey topping is baked on the bottom, and then the buns inverted for serving. So it is in the Flour version, where an indulgent bath of butter, brown sugar, honey and whole pecans.

The next day, the dough is rolled out, sprinkled with cinnamon-sugar and chopped pecans.

Rolled up, and sliced into buns.

Which then get placed on what will become the sticky topping.

After baking.

Inverted.

The end result.

The Nancy/Julia Version
The dough starts out the same way, with similar ingredients – flour, yeast, milk, eggs, butter. However, the really interesting twist here is that this basic brioche dough is then further enriched, much like a croissant dough, through the “laminating” process – folding and rolling butter into the dough so that many, many thin layers. No pictures of this stage, as we’ve shown this approach previously here and here.
Similar jelly-roll technique and cut into buns.

Key difference: the pan is coated with a thick layer of butter and brown sugar, versus the more caramel-sauce approach in Flour.


After the rise.

After baking and inverting.

The end result.

Our Conclusion
First and foremost, these are both AWESOME sticky buns! We shared them (well, most of them) with friends in town, including J&S, the previous owners of Avery House, our contractor (while he was on break from finishing up our renovations this winter) and a couple of other keen palettes. Huge hits with everyone.
As noted at the outset, what is really interesting is how different these two recipes turned out. We could identify two key differences, that although seemed small, resulted in very different outcomes.
-
The Flour approach kneads all the butter into the dough, while the Nancy/Julia recipe makes a slightly leaner dough that is then laminated with butter.As a result, the Flour version ended up being “softer and more melt-in-your-mouth” while the other resulted in a more flakey, layered texture.
-
There was way too much caramel sauce in the Flour recipe, but the texture that it produced was preferred by most (not all) of our taster-victims.The Nancy/Julia version, which lined the pan with butter and brown sugar only, created a really yummy caramel layer that was delicious while still hot from baking.However, shortly after cooling, that topping became quite hard. While it was certainly “sticky,” it verged on filling-extracting toffee.
We’re going to make a few more tweaks to create something of a hybrid between the two. Both create excellent end products, and we think a compromise between the two will be best yet. Sticky Buns will definitely be on the breakfast table, once in a while, during 2016.
Let us know what you think!
Filed under breakfast, Feb 9, 2016
Comments (1)
When Life Gives You.. a LOT of Oranges
A lovely friend gave us a gift. A 30 pound box of oranges from Florida, delivered by truck to Stratford. They were delicious! However, that is a lot of oranges for us to eat, even if they are fabulous.
We were reminded of this clip from the 1990s sit-com, Everybody Loves Raymond (apologies for the poor video).
Since we had been on a bit of a jam- and jelly-making kick, we thought we could put some of the excess citrus to good use in some marmalade. Typically, marmalade is made with Seville oranges, which are quite tart and have that characteristic bitterness that marmalade aficionados love. What we had were Navel oranges – very sweet and juicy – and so we decided to offset with the addition of some limes and lemons.
Making marmalade something like jam-making, but there are some differences as well, as the following illustrates.
First, the fruit is washed and scrubbed well. As both the skin and the juice goes into the product, any dirt or residue needs to be removed. Some fruit growers apply an “edible wax” to the citrus to give it a showroom shine in the supermarket. We’d rather not have that in our marmalade, edible or not.


The fruit is squeezed, and the juice reserved.

The bitter pith (the white membranes) as well as the seeds are scraped out. While their texture isn’t appealing in the finished spread, they do contain natural pectin, and flavour that helps thicken the marmalade. Pith and seeds go into a muslin bag, so that they can add to the concoction, but then be easily removed at the end of the process.

The peels get boiled in plain water to soften, without the juice, but with the bag of pith. The boiling process is important, in order to soften the zest. Once sugar is added, the peels will not get any softer. Then, the peels are sliced into smaller pieces or strips. Again, tastes vary – some fans love thin strips of the peel, whereas others like it thick-cut. We went for a happy medium. You can see the muslin bag at the bottom left, happily simmering away.

Sugar is warmed in the oven at low temperature. Apparently (maybe urban legend) this helps prevent the sugar from recrystallizing in the marmalade when it cools. It does also help prevent the temperature from dropping too much when it is added to the hot liquid. Juices are added back, and mixture brought to a vigorous boil. This drives off some of the water in the mixture, and activates the pectin with the sugar.
Canning jars thoroughly washed and sanitized in boiling water.

Key tools: canning funnel, ladle.

Boiling down.

Target temperature is about 220-222F. We like using our instant-read for this kind of project.

The most reliable way to make sure the texture will be right is through the “skin test.” Put a spoonful of the jam on a cool plate and let sit in the freezer for a few minutes. If it makes a wrinkly skin when pushed with a finger, the batch is done.

The monster cauldron for water processing. This is actually a pressure-canner (hence all the valves and screws) but is used as a regular canner for this application.

Boiling hot jam allowed to cool for a few minutes, and then laddled into hot jars.


The end result.

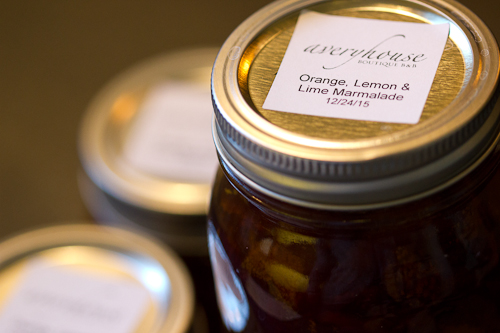
The verdict: pretty sweet for a marmalade, and lacking the characteristic bitter edge, despite the addition of lemon and lime. However, still quite tasty, and will definitely offer to guests. Looking forward to when Sevilles come into season in a month or so!
Feel free to add a comment or question below.
Filed under breakfast, Dec 25, 2015
Comments (0)
R&D for 2016: Cronuts!™
The next few blog entries we'll be sharing some different "Research and Development" projects we're undertaking this winter in order to bring something new to our breakfast for the 2016 season. In today's entry, we take on The Cronut!
From our very first season, our homemade croissants have been a pretty consistent feature at the breakfast table a few times a week – in either classic form, or the more indulgent chocolate kind.
However, for many years we’ve been intrigued by the phenomenal success of The Cronut™. For those of you who missed all the buzz, a cronut (no more annoying TMs for the balance of this entry) is generally credited to be the creation of Dominque Ansel, French pastry chef, at his Bakery in New York. It is a hybrid between a croissant (with its traditional layering of dough and butter to produce the characteristic flakey, crispy texture) and a doughnut, as it is fried, filled and iced.
Apparently, the launch of the product took New York by storm, with customers lining up hours in advance of The Bakery opening each morning, and only a limited quantity of cronuts to be had. Lots of media attention followed, along with competing claims from other chefs that they had created a similar product earlier, under other fun names like “dosants” or “doughssants” or “the Big O.”
The Wikipedia entry on cronuts itself is an interesting read.
We wondered if a cronut deserved all the hype, and, if so, should it be part of our breakfast pastry rotation?
Chef Ansel, who has been a staunch defender of his creation (including that annoying TM mentioned earlier) kept the recipe and procedure a closely-guarded secret for many years. However, in 2014, he published a cookbook, in which he revealed the mystery in a “home cook” format. He defended the reversal in his position from secrecy to publicity, since he felt “no home cook is going to go through the three day process.” Well, we were crazy enough to take on the challenge! In reality, it is not that difficult, and the procedure is very similar to croissants, of course.
It starts with a simple dough of all-purpose flour, egg white, sugar, milk, water, salt, butter, and yeast.

Mixed with the dough hook just until a loose dough forms, and not further. The gluten, which gives all breads their structure, will be developed during the repeated rolling and folding steps, versus through kneading that s employed in a typical dough.

In all laminated doughs (i.e. pastries that are layers of dough and butter), the more accurate one can be with the shaping the better. An easy trick is to draw out the desired sizes on parchment paper (flip it over so the pen marks don’t touch the dough). Here, one sheet of parchment has the dough size mapped out; the other sheet is for the butter block. Using a rolling pin to end up with a square is one part of the process that takes some practice!

The butter block shaped into its square.

Dough and butter taking a nap in fridge to cool down. If the butter and dough are not both chilled, the butter will melt into the dough, instead of staying in distinct layers.

Butter block in place on the dough, in a “diamond” orientation. The dough is then folded up and over the butter, sealing it inside. The dough is then repeated rolled out and folded, so one ends up with many, many very thin layers of butter in between dough. A rest in the fridge is needed in between each folding process.

Just before the final rollout. Dough/butter shaped back into a 10” square.

Traditional doughnut shape (and holes!) being punched out.

Lined up on sheet pans for the final rise.

After rising, before cooking. You can see the layers of dough separated by butter. When exposed to heat, the water in the butter will convert to steam, puffing up the dough (along with the yeast) and the butter will melt into the dough, leaving spaces in-between. Hence, the flakey nature of croissants.

Just out of the hot oil. Crispy and golden!

A simple glaze of icing sugar, vanilla and milk.

Brushing on the glaze.

The finished product.

A cut-away, showing the layers and layers inside.

The verdict? This was a pretty amazing pastry. We found that the texture was the most remarkable thing about it. Intensely crunchy and flakey. The flavour was pretty good. A “classic cronut” also has a cream filling inside, which we skipped for this experiment. We think a flavourful filling, perhaps a homemade jam or a maple/cream filling would go nicely.
Cronuts might have a place on our breakfast menu once in a while. There is definitely a novelty factor to them, and our guests do seem to like indulgent treats once in a while. We’ll try it out in 2016, and see what our guests think!
Please feel free to leave a comment or question below.
Filed under breakfast, Dec 23, 2015
Comments (1)
Reviving Summer... in a Jar
Here in Southwestern Ontario, we certainly get to experience all four seasons of the year. That means that sourcing ingredients locally – notably fresh fruit – entails acting quickly when the right window comes along. That’s why we like our local Farmer’s Market so much. Every Saturday morning, from late May through early October, after breakfast has been served and dishes tidied, John heads out to the Market to see what is at its peak that week. The rhubarb of May gradually gives way to the first delicious strawberries of late June. Then the onslaught of raspberries, blueberries and cherries in August… and peaches! Then plums, apricots, and finally, the warning bell that the flood will soon be waning: pears.
Here's the haul from the Market in late summer, 2015:

This year, we took a different approach, buying enough fresh fruit for the next several days’ breakfast each Saturday, but also getting a little extra on each trip, which we “put up” to stockpile in the freezer. If the fruit is frozen properly – prepped, set out on sheet pans, frozen quickly, and then vacuum sealed – it holds remarkably well. And, even after freezing, local produce has a much better flavour than fruit shipped thousands of miles out-of-season.

Of course, the texture of frozen fruit is not the same as fresh, and so it is best used in cooked applications. It was delightful to serve a strawberry-rhubarb cobbler on a chilly October morning towards the end of the 2015 Festival season.
But what we’re really excited about is a new addition to our breakfast menu for 2016 – homemade jams and jellies. John has done a lot of canning in the past, but until now hasn’t had the opportunity to make enough quantity for guests. That’s changing!
For many years, he has been a fan of a well-known Alsatian artisanal jam-maker, Christine Ferber. She is a remarkable woman, who you can read about here and here. Not only is her reputation and commitment to local, quality ingredients very much aligned with our own philosophy; in addition, the obstacles she has overcome during her career are a further testament to her character. She’s earned the title in her native France of la fée des confitures (the "jam fairy").
John has several of her books, and is especially fond of Mes Confitures. Just reading about the innovative and unconventional flavour pairings that Ms. Ferber creates is pretty inspiring. Most important, however, is the fundamental technique she shares for jam-making.
Typically, jam is made by combining fresh fruit, a ton of sugar, and packaged pectin in powdered or liquid form. Then, the mix is boiled heavily to evaporate water and activate the pectin-sugar combination to thicken the jam. There are a few drawbacks to this traditional approach: first, the extended boiling of the fruit removes much of its fresh flavour and colour, resulting in a muddy appearance and lack of brightness in taste. Second, the amount of sugar needed to activate the commercial pectin is quite high, so jams made this way are really sweet, but not fruity, with all the acidity muted.
Ms. Ferber’s approach is a little different, and requires a bit more work, but the results are worth it. The fresh (or frozen) fruit is gently warmed with sugar, just to dissolve the sugar crystals. Then, the mixture is covered and refrigerated overnight. During this rest, the sugar draws the juice (mostly water) out of the fruit. Next day, the fruit is strained. The resulting sweetened juice is then boiled (without the fruit) to evaporate the water. Homemade pectin (which we derived from local green apples, before they ripened, and so were rich in the pectin) is added at the last minute, in much smaller quantities than is typical. Finally, the fruit is added back to the much-reduced juice and brought up to a brief boil. Better texture and flavour, without the cloying sweetness of commercial jam. Of course, starting with local fruit is critical as well. Then, into sterilized canning jars, a hot water canning bath, and done!

We’ve done up five different flavors so far: Apple Jelly, using a few different local varietals, including beautiful Paula Reds which we found at a lovely grove about 30km away - adds a rosy glow to the finished product, paired with some ancient unknown variety from a 100-year+ old tree here in town.


Taking advantage of the abundance of apples, we also did a decadent Apple Butter, thick and rich, with hints of warming cinnamon. Peaches from Niagara paired beautifully with Vanilla Bean in a sticky-sweet chunky jam. Purple plums made a really delicious jam, with a tangy pucker to it. Rhubarb (from right here in the neighbourhood) with Crystalized Ginger – nice bite from the ginger. And a combination of sweet Bing and sour Morello-type cherries, with a hit of Amaretto (the almond flavour of the liqueur goes nicely with cherries, as the nut and fruit are closely related).

We’re pretty pleased with our “pantry-loading” efforts to-date. On a chilly winter morning, pulling jars of homemade jam from the hot-water bath is warming – physically and emotionally. We think these new additions to the menu will go nicely with our homemade croissants!

Filed under breakfast, Dec 18, 2015
Comments (2)
Top Your Own... Bagels!
John came across the name Peter Reinhart many years ago, when the latter had an article publish in Fine Cooking magazine (here) with great instructions for making outstanding bagels at home.
Over the years, as Peter published more and more cookbooks, John assiduously acquired each one... Brother Juniper's Bread Book (Peter was a lay-member of a religious order); Artisan Breads Everyday; Bread Baker's Apprentice (James Beard Award winner); Crust & Crumb; American Pie (a great exploration of the various forms of pizza). In other words, John was sort of a Reinhart-groupie, and has been lucky enough to meet Peter on a couple of occasions, as well as swap helpful (to John) emails with him over the years. You can read about Peter's most recent adventures on his blog here.
FYI, Peter is an instructor/chef at the prestigious Johnson & Wales university/cooking school. In addition, as John and some colleagues lovingly referred to him, Peter is the "dough god." :)
We had some guests (who turned out were wonderful folks) stay with us for a stretch, who specifically said that they had read this blog, and one of them didn't like quiche, frittata or anything else "eggy." As we thought about what to serve them, the memory of Peter's bagels surfaced.
So, here's a photo-journal of the process!
Dough shaped into little balls (very dry, stiff dough, made with high-gluten bread flour):

After proofing, in a more bagel-like shape:

After the boil, which gives bagels their characteristic chewy texture, topped (and bottomed) with a mix of sesame, poppy and fennel seeds:

Just out of the oven:

The "top-your-own" part: smoked salmon (lox); heirloom tomatoes; red onion, lemon, capers, cream cheese:

Finished product:

Thanks Peter!
Filed under breakfast, Sep 25, 2013
Comments (0)
.